Creating Progressive Web Apps Using Angular
READ WHOLE ARTICLE
Progressive web applications burst out of the IT market 4 years ago and now became a new trend for both small companies and enterprises. It was caused by their special concept of being an adopting and universal web application built with essential web technologies (HTML, JS, CSS).
We’ve noticed a huge interest in building PWAs among businessmen and entrepreneurs so in this article we aim to show the whole development process of PWA by using Angular 8 and share prominent Angular PWA examples.
If you haven’t heard about it yet or are looking forward to creating such an app, keep reading - here’s an Angular PWA tutorial 8 for you!
The nature of PWA
PWA or progressive web application is an app which behaves like a native app but can be used by devices with various platforms on ease.
Why is it more effective and useful to develop a PWA:
- While browsing the web users can switch to progressive applications from shared links in social networks. Obviously it is a lot more convenient than being involved in competition for users with a huge number of available applications on the IOS App Store or Google Play Store.
- A proposal to install a progressive application is shown as soon as you visit the sites.
- Installation of the application starts immediately. When the user first visited the site, all components, that require long loading,have already been saved in the cache.
- Progressive applications take up less storage space because they effectively use the capabilities of the browser.
- All functions of the progressive application, including pop-up notifications and offline work will be available, even if the visitor has never installed it.
- Usually native applications are created for one platform and can be used only on it. You cannot use the application on your computer in the same way as on an Android or iOS device. In addition, only those who installed it can use the application. With PWA this issue was already been solved.
- PWA is cheaper to build. You don’t need to create a number of native apps for each platform and spend much money on it. Instead of it, you can build the only one app for many stages at once.
Now let’s go deep into building process of PWA with Angular 8.
Step #1. Create a project
To start work you should get the latest version of Angular CLI which requires Node.js >=10.16. Figure out whether you have such version on your PC before installing Angular by giving the command:
$ node – v

Go to the Node official page to get the latest version if you don’t have it yet. After that, you are good with installing the latest version of Angular CLI so run the following command: $ npm install -g @angular/cli Your npm configuration and operating system matters so you might need to stick _sudo_ to install it in full way. $ sudo npm install – g @angular/cli Then you can create your own Angular 8 project by running such command as: $ng new NgPwa So your project’s files structure will look like this: The src/ folder will keep the most part of done work which contains the app source code. | 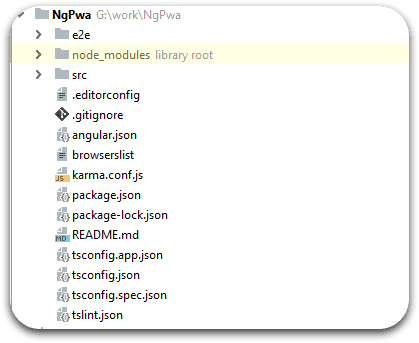 |
Step #2. Start creating an Angular app
After starting our new project, we are going to make a web application and for further making PWA with Angular. It will consume a JSON API and show things on the home page. To send HTTP requests we will need the HTTPClient service and also we will use Angular Material for creating user interface.
1. Add Angular Material
It’s pretty simple to add Angular Material to the project because you need only one command:
$ cd NgPwa
$ ng add @angular/material
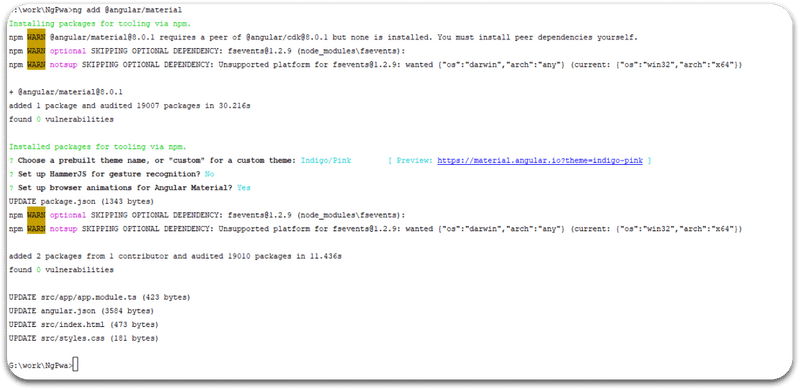
In the screenshot it’s clear that the required package was installed from npm and a pack of files for setting up Angular Material was got too.
2. Set up HTTPClient and consume JSON API
Previously we spoke about HTTPClient for sending requests and now it’s time to set it up. You need to import HTTPClient module in the src/app.module.ts file(the main app module):
/*...*/
import { HttpClientModule } from  '@angular/common/http';
@NgModule({
declarations: [
AppComponent
],
imports: [
/*...*/
HttpClientModule
],
providers: [],
bootstrap: [AppComponent]
})
export  class  AppModule { }
Now it’s done and you can utilize HTTPClient anywhere in the main module.
For this example we will use the Simplified JavaScript Jargon GitHub repository to generate a JSON API. In case you are going to consume any other resource, ensure that you have CORS to escape your browser forbid reading the remote sources due to the Same Origin Policy.
Then we need to create a service which will interface with our API. Run the following command inside your project folder:
$ ng g service api
This line will create ApiService in the src/app/api.service.ts file. Open this file and update it to see performed changes:
import { Injectable } from  '@angular/core';
import { HttpClient } from  '@angular/common/http';
import { Observable } from  'rxjs';

export  interface  Item {
    name:  string;
    description:  string;
    url:  string;
    html:  string;
    markdown:  string;
}

@Injectable({
providedIn:  'root'
})

export  class ApiService {
    private  dataURL: string  = "https://www.techiediaries.com/api/data.json";
    constructor(private  httpClient: HttpClient) {}
    get():  Observable<Item[]>{
        return this.httpClient.get(this.dataURL) as Observable<Item[]>;
    }
}
By following commands we:
- imported the HTTPClient and Observable classes;
- declared an Item interface.
- injected the HTTPClient in the constructor;
- added a get() method which returns an Observable;
Next step we need to do is to import the service in the app component. Here you should open the src/app/app.component.ts file and add:
import { Component, OnInit } from  '@angular/core';
import { ApiService } from  './api.service';
import { Item } from  './api.service';

@Component({
    selector:  'app-root',
    templateUrl:  './app.component.html',
    styleUrls: ['./app.component.css']
})
export  class AppComponent  implements OnInit{
    title  = 'NgPwa';
    items:  Array<Item>;
    constructor(private  apiService: ApiService){
    }
    ngOnInit(){
        this.getData();
    }
    getData(){
        this.apiService.get().subscribe((data:  Array<Item>)=>{
        console.log(data);
        this.items  = data;
    }, (err)=>{
            console.log(err);
        });
    }
}
We import the ApiService that we made previously and we inject it as apiService, we additionally import the Item class which describes a data structure of our JSON information and we declare the items variable of type Array<Item> which will hold the brought things.
Next, we call a getData() function which calls our get() method that we declared in the ApiService which returns an Observable. We basically subscribe to this observable so as to send a GET request to our JSON endpoint and get the response data.
We call the getData() function in the ngOnInit() life-cycle hook so it will be called once the AppComponent component is initialized.
Step #3. Add the application user interface
Our application user interface will comprise of a header bar and the skeleton of the page which will be made with Angular Material.
Prior to utilizing an Angular Material component, you’ll have to import its module. Every Material component has a place with its own module.
Open the src/app/app.module.ts file and add the following imports:
/*...*/
import {MatButtonModule} from '@angular/material/button';
import {MatExpansionModule} from '@angular/material/expansion';
import {MatToolbarModule} from '@angular/material/toolbar';

@NgModule({
    declarations: [
        AppComponent
    ],
    imports: [
        /*...*/
        MatButtonModule,
        MatExpansionModule,
        MatToolbarModule
    ],
    providers: [],
    bootstrap: [AppComponent]
})
export class AppModule { }
We import modules for toolbar, expansion panel and button components and we add them to the imports cluster of the AppModule.
Next, open the src/application/app.component.html file, erase what’s in there and include:
<mat-toolbar color="primary">
 <mat-toolbar-row>{{title}}</mat-toolbar-row>
</mat-toolbar>
<mat-accordion>
 <mat-expansion-panel *ngFor="let item of items">
   <mat-expansion-panel-header>
     <mat-panel-title>
       {{item.name}}
     </mat-panel-title>
   </mat-expansion-panel-header>
   <div [innerHTML]="item.html"></div>
   <a mat-button [href]="item.url">Go to full article</a>
 </mat-expansion-panel>
</mat-accordion>
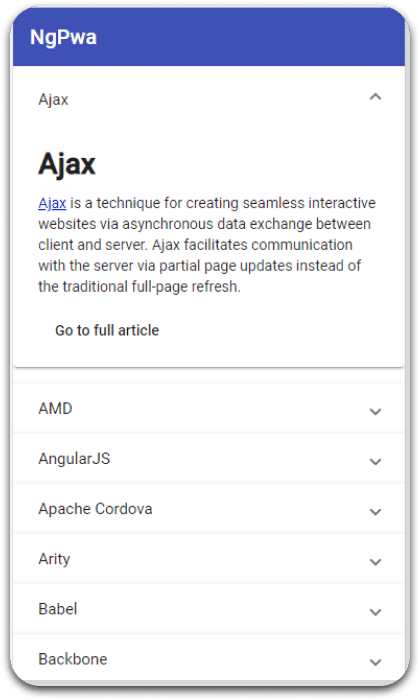
We utilize Material parts to make the user interface. The <mat-toolbar> segment is utilized to make a Material toolbar and the <mat-accordion> with <mat-expansion-panel> part is utilized to make a Material Expansion Panel and so forth.
We iterate over the items array which gets populated by the getData() strategy when the part is instated, and show things as Material Expansion Panel. Each panel contains the name of article. Click on each panel opens accordion item with description and a link for more information (The link is styled as a Material button using the mat-button directive).
This is a screen capture of the application:
Step #4. Build The Application For Production
 | Ordinarily, when checking your application for PWA features you should initially fabricate it for creation in light of the fact that most PWA options are not included in development. For instance, you would prefer not to have service workers and caching empowered being developed since you will occasionally need to refresh the files.
How about we manufacture the application for production utilizing the accompanying command: $ng build –prod The production build will be accessible from the dist/NgPwa directory. We can utilize an instrument like http-server to serve it. To begin with, get http-server installed utilizing this command: $npm i -g http-server And you can run it by: cd dist/NgPwa $ http-server -o The – o choice will naturally open the default browser in your system and explore to the http://127.0.0.1:8080/address where our web application is accessible. |
Step #5. Analyze The Application Using Lighthouse
How about we currently examine our application utilizing Lighthouse.
Lighthouse is an open-source auditing tool made by Google which can be utilized to review sites and applications for availability execution, SEO, best practices and PWA options.
You can get to Lighthouse from the Audit tab in Chrome DevTools as a module in Node.js or as a CLI tool. You can utilize Lighthouse by giving a URL and after that, running the audits which will furnish you with a report containing the auditing results which are essentially proposals on how you can improve your web application.
To start analyzing, first launch Chrome and come to the application address http://127.0.0.1:8080/ .
Then you should open DevTools or press CTRL+SHIFT+I and point to the Audit panel.
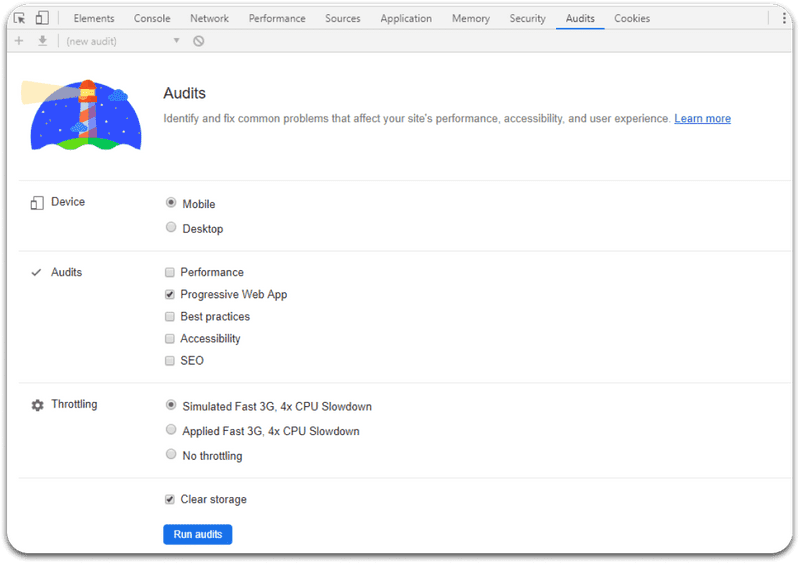
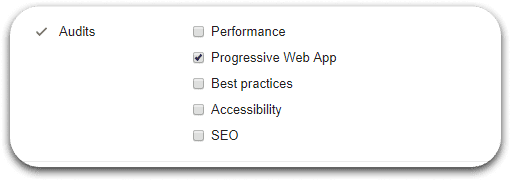
You ideally need to set the Emulation to Mobile rather than Desktop to compete a mobile environment. You’ll have an list opened in which you have to pick the kinds of the audits you need to perform against your web application. Un-check different types except Progressive Web App and click on the Run an audit button.
Then Lighthouse is generating a report. It will look like this:
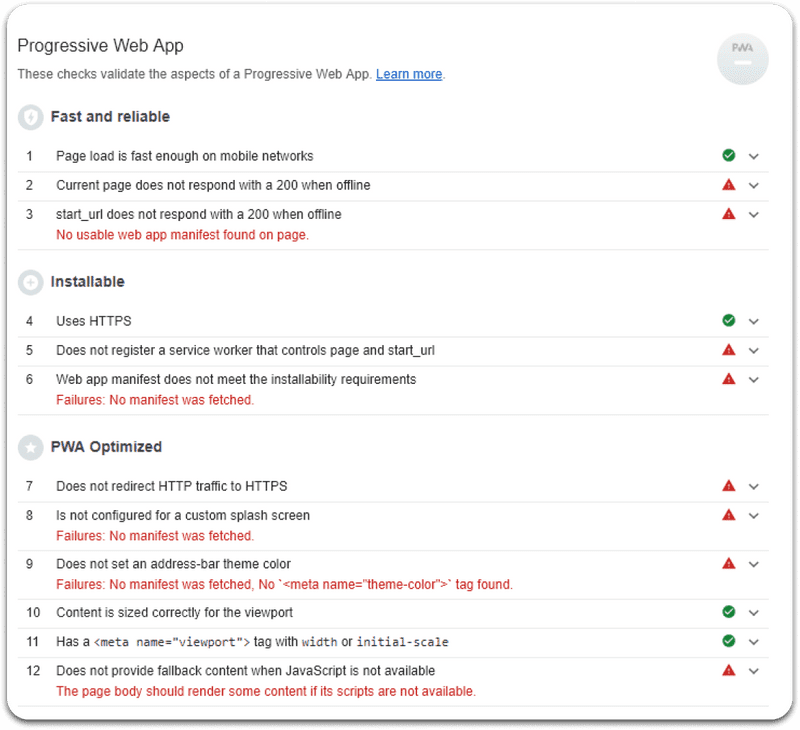
Lighthouse will provide a number of checks to see that the app corresponds to PWA Checklist. We got 8 failed audits scored now involving Service Workers, Progressive Enhancement, HTTPS and Web App Manifest which are the core points of PWA and are most frequently occurred.
Service worker
Two failed audits (“Does not register a service worker” and “Does not respond with a 200 when offline”) are related to Service Workers and caching.
A Service Worker is an element that is accessible on today’s browsers which can be utilized as a network proxy that gives your application a chance to capture network solicitations to cache resources and information. This could be utilized for executing PWA options, for example, support service without Internet connection and push notifications, etc.
To fix this problem we essentially need to enroll this service and use it to reserve files locally. Whenever with or without Internet connection, the SW should restore the privately cached variant of the file.
Progressive enhancement
Another failed audit (“Does not provide fallback content when JavaScript is not available”) is related to Progressive Enhancement which is an essential and works for availability of the web app on various browsers with all the features.
HTTPS
The next bombed audit (“Does not redirect HTTP traffic to HTTPS”) is identified with HTTPS which is likewise a center part of PWAs (service workers can be just served from secure sources, except from localhost). The “Uses HTTPS” audit itself is considered as gone by Lighthouse since we’re inspecting localhost however once you utilize an actual host you need a SSL certificate. You can get a free SSL certification from various services, for example, Let’s Encrypt, Cloudflare, Firebase or Netlify and so on.
The web app manifest
The three bombed audits (“User won’t be prompted to Install the Web App”, “Isn’t configured for a custom Splash Screen” and “Address bar does not match brand colors”) are identified with a missing Web App Manifest which is a file in JSON format that gives the name, depiction, icons and other data required by a PWA. It gives clients a chance to install the web application on the home screen simply like local applications without experiencing an application store.
You have to give a web application show and reference it from the index.html file utilizing a <link> tag with rel property set to manifest.
Step #6. Fix audit issues
Now we will fix previously discussed failed audits by using several commands.
Implementing PWA features
You can easily add PWA features to the application by using Angular CLI v8. The only one command in the project root is needed to transform your app into a PWA:
$ ng add @angular/pwa
PWA features are automatically added to the Angular app, such as:
- A manifest.webmanifest file,
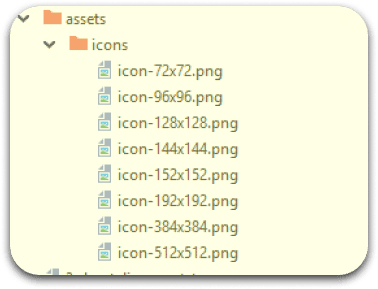
- Various sizes of icons in the src/assets/icons folder,
- The ngsw-worker.js service worker.
And now we should run the build of the app for production one more time to apply the changes by the following command:
$ng build –prod
Open the dist/ folder which includes the production build. There are a lot of files but you should focus on only the files related to PWA that were mentioned earlier.
A manifest.webmanifest file was added with such content:
{
 "name": "NgPwa",
 "short_name": "NgPwa",
 "theme_color": "#1976d2",
 "background_color": "#fafafa",
 "display": "standalone",
 "scope": "/",
 "start_url": "/",
 "icons": [
 {
     "src": "assets/icons/icon-72x72.png",
     "sizes": "72x72",
     "type": "image/png"
   },
   {
     "src": "assets/icons/icon-96x96.png",
     "sizes": "96x96",
     "type": "image/png"
   },
   {
     "src": "assets/icons/icon-128x128.png",
     "sizes": "128x128",
     "type": "image/png"
   },
   {
     "src": "assets/icons/icon-144x144.png",
     "sizes": "144x144",
     "type": "image/png"
   },
   {
     "src": "assets/icons/icon-152x152.png",
     "sizes": "152x152",
     "type": "image/png"
   },
   {
     "src": "assets/icons/icon-192x192.png",
     "sizes": "192x192",
     "type": "image/png"
   },
   {
     "src": "assets/icons/icon-384x384.png",
     "sizes": "384x384",
     "type": "image/png"
   },
   {
     "src": "assets/icons/icon-512x512.png",
     "sizes": "512x512",
     "type": "image/png"
   }
 ]
}
The added manifest.webmanifest file has all the information required(name, description, start_url, etc).
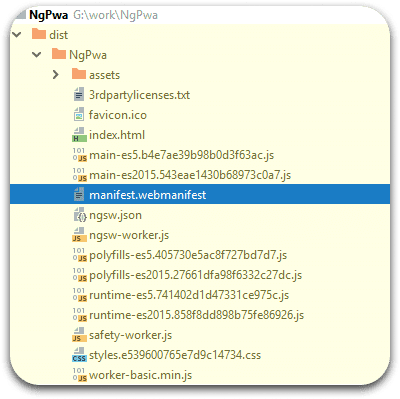 | Icons of different sizes were also added in the assets/icons folder automatically and are linked to the manifest.webmanifest file. You will need to change them for your own when finishing building the app.
 |
In the index.html file, the manifest.webmanifest document is referenced utilizing:
<link rel=”manifest” href=”manifest.webmanifest”>
The ngsw-worker.js file include Service Worker and was also added there. src/app/app.module.ts file has the code for installing SW automatically:
...
import { ServiceWorkerModule } from  '@angular/service-worker';
@NgModule({
    declarations: [
        AppComponent
    ],
    imports: [
        ...
        ServiceWorkerModule.register('/ngsw-worker.js', { enabled:  environment.production })
    ],
Ng add command installed the @angular/service-worker and added as a dependency to NgPwa/package.json:
    "dependencies": {
        ...
        "@angular/service-worker": "^6.1.0"
    }
The SW build support is likewise empowered in the CLI. In the angular.json file a “serviceWorker”: true configuration is included.
In the index.html file a meta tag for theme-color with a value of #1976d2 is included (It likewise relates to the theme_color value in the manifest.webmanifest document):
<meta name=”theme-color” content=”#1976d2″>
The browser is told what color to tint user interface elements as the address bar by the theme color. Usually theme color which is added to index.html and manifest.webmanifest files will fix the Address Bar Matches Brand Color audit.
The service worker configuration file
Another file src/ngsw-config.json is added to the project however It’s not a required file for PWAs. It’s configuration file which enables you to indicate which docs and information URLs the Angular service worker should cache and how it should refresh the stored files and information.
After fixing all the issues, we should recheck the audits again. And here is a new check result:
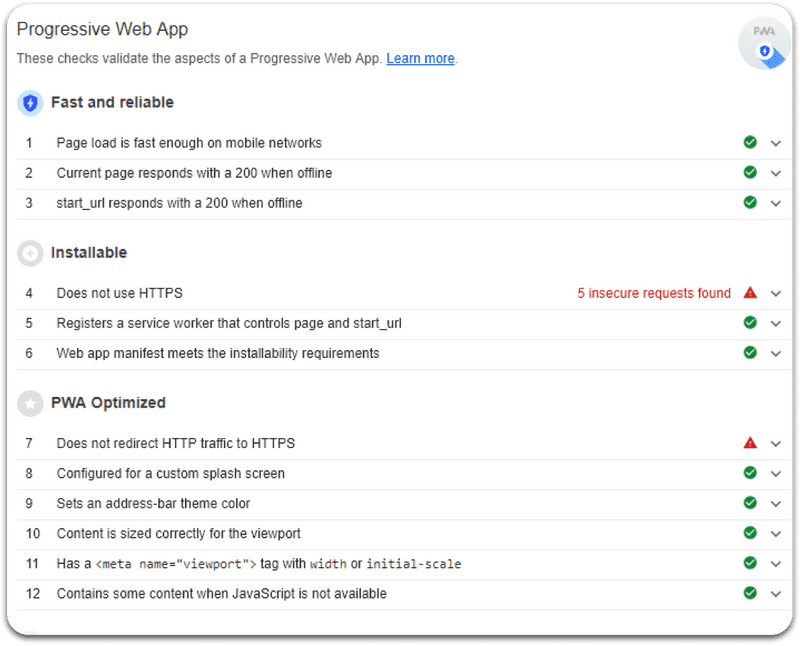
Now we still have two audits failed. The Angular CLI automatically add the JavaScript fallback code we mentioned in the Progressive Enhancement section so this issue is fixed immediately. The last failure is about HTTPS redirect. To fix it, we will host the app and configure HTTP to the HTTPS redirect.
And now we have the audits again.
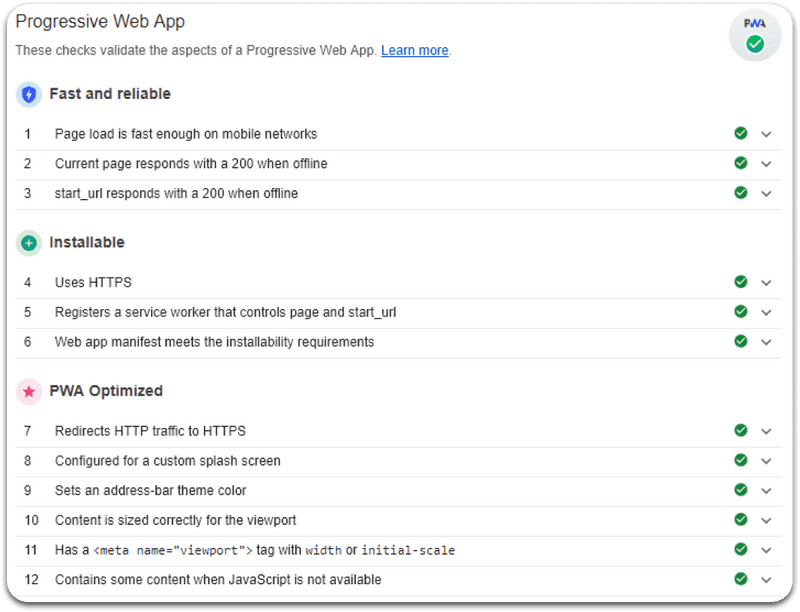
We have everything well-done, so all core tenets of the PWA were successfully implemented. Testing PWA Angular performance is essential here. Now we have ready-to-use Angular PWA!
Summary
In this Angular tutorial, we have built a basic Angular app and transformed it into a progressive web application just with using Angular CLI. We’ve checked the app with Lighthouse Chrome extension for PWA options.We added offline support(using Service Worker) and explained different core tenets of PWAs. With the SW help, you can also add push notifications, if you need it. We enabled add-to-home-screen and splash screen features with the Web Manifest file. And finally got our Angular PWA worked on the globe. It couldn’t be so easy way to achieve the goal so Multi-Programming Solutions is here to help. We are aware of the latest techniques of creating and launching Angular PWAs and open for new projects to be developed. We will provide the most suitable solution for your business.
Contact us to get the consultation!

36 Kings Road
CM1 4HP Chelmsford
England


